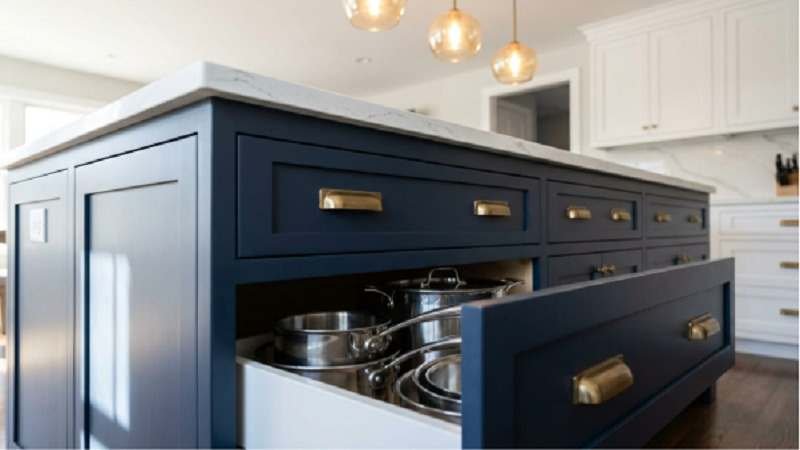
Ask any kitchen designer what single feature homeowners request most often, and the answer is almost always the same: a kitchen island. It has become the default centrepiece of new builds and renovations alike, and for good reason. A well-planned island does more work than any other element in the room. It adds storage, creates a second workstation, gives guests somewhere to sit, and often becomes the visual anchor that ties the entire kitchen together.
But not all islands are created equal. The difference between an island that gets used constantly and one that becomes an expensive obstacle comes down to a handful of planning decisions that are easy to overlook until it is too late to fix them cheaply. Hardware is a good example of this: pull length and placement rules are easy to get wrong, and a closer look at handle options for shaker-style cabinets is worth a few minutes before you place any hardware orders, since correcting it after installation is far more annoying than getting it right the first time.
Getting the Size Right
The single most common island mistake is building one that is too small to be useful or too large to move around. As a general rule, you want at least 42 inches of clearance on all sides for comfortable traffic flow, and 48 inches if more than one person will be working in the kitchen at once.
If you want seating, the island needs to be at least six feet long to accommodate an overhang plus workspace. Overhangs for seating should be a minimum of 12 inches for basic legroom, though 15 inches is noticeably more comfortable for adults. For every person you want to seat, allow roughly 24 inches of width so elbows do not collide during meals.
If a sink is going into the island, add extra length. You need enough room on either side of the sink for prep space, which usually pushes the minimum island length past six feet once you factor in seating as well.
Storage That Actually Gets Used
An island without a storage plan is just a big box in the middle of the room. The best island designs treat every side and every internal cavity as an opportunity. Deep drawers with built-in dividers hold pots, pans, and small appliances far more efficiently than a standard base cabinet with a single shelf. A dedicated pull-out for cutting boards and baking sheets keeps flat items from getting lost behind everything else.
The ends of an island are often wasted space in basic designs. Open shelving on an end cap gives you a spot for cookbooks or display pieces. If you would rather hide things, the same space works well for a trash and recycling pull-out, keeping bins out of sight without sacrificing a single inch of your primary cabinet storage.
Some homeowners are now building charging stations directly into an island drawer, keeping phones and tablets off the counter while you cook. It is a small addition, but it solves a problem almost every household has.
Appliances Inside the Island
Putting an appliance in the island keeps your perimeter counters clear for prep work. Microwave drawers are a popular choice because they tuck below the counter and open like a drawer rather than taking up wall or counter space. Beverage refrigerators and warming drawers are also common additions for households that entertain regularly.
If you are adding a sink to your island, the faucet becomes a major decision. A high-arc faucet with a pull-down sprayer makes it far easier to fill large pots, and touchless models are worth considering if your hands are frequently covered in flour or raw ingredients during meal prep.
Seating That People Actually Want to Use
Seating height depends on your counter height. Standard 36-inch counters call for 24 to 26-inch counter stools. If you prefer a more casual bar feel, raising one section of the island to 42 inches and pairing it with 30-inch bar stools creates a nice separation between the kitchen and adjoining living space.
Backless stools tuck away neatly and work well in smaller kitchens, while upholstered chairs with backs are more comfortable for guests who linger over a meal. Metal stools tend to suit modern and farmhouse kitchens equally well, while upholstered seating adds a softer, more residential feel.
Materials and Finish Choices
Mixed-material countertops have become a popular way to make an island functional and visually distinct from the rest of the kitchen. Stainless steel paired with butcher block gives you a durable prep zone next to a warmer, more tactile surface for serving or casual dining. Waterfall edges, where the countertop material continues down the sides of the island to the floor, add a dramatic, furniture-like quality that many homeowners are choosing for a more elevated look.
Wood tones on the island specifically, paired with a different colour or material on the perimeter cabinets, is one of the most requested two-tone combinations right now. It gives the island the visual weight of a statement piece rather than just another bank of cabinets.
Hardware Is Not an Afterthought
Once the layout, storage, and materials are settled, hardware is the detail that ties the whole island together. Matte black hardware creates a sharp, high-contrast look against white or light cabinets and resists fingerprints well, which matters on a piece of furniture that gets touched constantly. Polished nickel offers a more classic, timeless look that works across a wider range of kitchen styles. Whatever finish you choose, make sure it feels substantial in your hand. Lightweight, hollow-feeling hardware is one of the fastest ways to make an otherwise expensive island feel cheap.
If your island uses shaker-style doors and drawer fronts, which remains the most popular cabinet door profile for good reason, hardware selection has its own set of sizing and placement rules that are worth understanding before you order. Pull length, knob placement, and the balance between knobs on doors and pulls on drawers all affect how the finished island reads, and getting these details wrong is an easy mistake to make and an annoying one to fix once everything is installed.
Lighting Above the Island
Pendant lighting over an island is not just decorative. It provides the task lighting you need for chopping, mixing, and reading recipes, while also serving as one of the most visible style statements in the room. A cluster of three pendants spaced evenly over a standard island is the most common configuration, though a single oversized statement fixture is gaining popularity for smaller islands or more minimalist kitchens.
Layering pendant light with under-cabinet lighting elsewhere in the kitchen prevents harsh shadows and creates a more balanced, comfortable space to cook in after dark.
Planning Before You Commit
Before finalizing any island design, mark out the proposed footprint on your kitchen floor with painter’s tape and live with it for a few days. Walk around it while pretending to cook, open the refrigerator, and move between the sink and stove. This simple exercise catches sizing problems that are nearly impossible to picture from a floor plan alone, and it costs nothing compared to correcting a built island that turns out to be poorly placed.
A kitchen island done well becomes the room’s natural gathering point for years. Done poorly, it becomes the expensive obstacle everyone learns to walk around. The difference almost always comes down to the planning details covered here, not the size of the budget behind the project.